Notion Formulas 2.0 represents a major milestone for code inside the no-code app. 2.0 includes a substantial rewrite of the 1.0 language. It introduces some important new powerful concepts to the language and makes a lot of difficult solves in the previous version much more pleasant to achieve.
Below you’ll find the key new concepts introduced in 2.0. You can also see a lot of these new concepts in action in my latest YouTube video (like and subscribe, you heathen!), but this article gets into some meatier details and code samples.
If this all seems patently terrifying to you, you should definitely sign up to get notified when my Formulas Fundamentals 2.0 course ships.
Major language changes
No more prop (kinda)!
One of the most major changes is that we partially will no longer use the prop function in Notion Formulas 2.0. Previously when we wanted to reference other properties in our database, we would write something like this…
length(prop("My Text"))
Formulas 2.0 introduces property tokens, and you more simply refer to them directly by name (and not as a string):
length(My Text)
In the editor, property tokens looks more like the image below, rendered with a grey background.
You’ll also note the addition of a live-preview area in the formula editor. This shows you a real-time preview of the formula result using the current “selected” page you open the formula editor from. More on this later on this page.
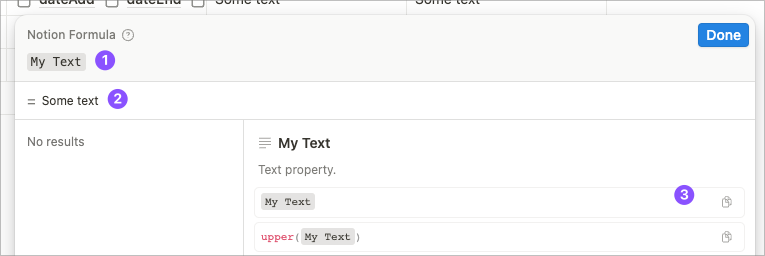
- A property token
- The live-preview area
- The documentation examples are now interactive and integrated (note that the examples use my property). You can click the page icon to copy the example to your clipboard.
One caveat here (and the reason I say “kinda”) is that in order to copy and paste into Notion formulas, you will have to copy a prop function call. So to share formulas in the wild, you’ll use prop still (and why I’ll be leaving prop in almost all my examples).
You can also type out a prop reference in the editor and it will be immediately translated into a property token.
You also get prop references in your clipboard when you copy property tokens from the Notion editor.
It’s pretty confusing, and a bit clunky. For now, know that I tend to leave in prop in examples because I want them to be copy and pasteable, but if you are typing your own code, you will largely no longer use prop (at least not directly).
Dot-notation syntax
Formulas 1.0 were mostly a functional programming language.
date(prop("Date"))
In the above example we are calling the prop function with the parameter "Date", a string. We are passing the result of that function call to the date function, which returns the day of the month from the provided date.
Formulas 2.0 introduces some concepts from object-oriented programming. While we can still do the following in Formulas 2.0, using a property token instead of a call to prop("Date")…
date(Date)
…we can now access the date function on the Date property object directly, using “dot-notation”:
Date.date()
In the former, the Date property is passed as an argument to the date function.
In the latter, we are calling the same date function, however, we’re calling it as a function on the Date object, so we don’t need to pass it in as the argument.
In short, you can generally call functions in two different ways in Formulas 2.0:
					/**
 * In the functional call, we pass the object we want to operate
 * on as the first argument
 */
dateAdd(Date, 1, "years")
					/**
 * In dot-notification style, we drop the first argument and call the
 * function on the object we would typically pass as the first argument.
 */
Date.dateAdd(1, "years")
While these look different, they will both end up calling the exact same dateAdd function with the same arguments, so the return result will be the same in both cases. Sometimes it boils down to your preference.
However, for more complex nested function calls, dot-notation makes for a more elegant writing experience, as well as reducing the possibility that we forget to close an errant parenthesis.
					/* Formula 1.0 */
dateAdd(dateAdd(prop("Date"), 1, "years"), 2, "days")

/* Formula 2.0 functional syntax (no more prop!) */
dateAdd(dateAdd(Date, 1, "years"), 2, "days")

/* Formula 2.0 object syntax */
Date
  .dateAdd(1, "years")
  .dateAdd(2, "days")
With dot-notation style, each call to dateAdd returns a Date object, so we can then call any methods defined on the date object again, allowing us to chain our function calls together with the .s.
Looking at the example above, you can see how the dot-notation style is a bit more readable and feels like more of a linear left-to-right-read statement than the functional counterparts above it. It reads more like instructions:
- Take the
Date - Add 1 year to it
.dateAdd(1, "years") - Then add 2 days to that
.dateAdd(2, "days")
Lists (Arrays)
Notion Formulas 2.0 now support Lists which look a lot like JavaScript’s Arrays. Though the API for lists is not a 1:1 map of JavaScript’s, there are a great deal of similarities, so learning how to use JavaScript Arrays will benefit you greatly in Notion Formulas 2.0 (as will JavaScript knowledge in general).
You can define arbitrary lists:
					/* From the list, return the element at the 0 index (which is 1) */
[1, 2, 3].at(0)
And perform operations on them similar to JavaScript Arrays:
					/* Returns another list multiplying each item in the array by 2 ([2, 4, 6]) */
[1, 2, 3].map(current * 2)
Some list functions (such as map above) that operate on lists receive an expression argument in which you can use the provided values current and index. Essentially this means that each item in the list is passed to the expression as current and for each “tick” of the loop, index is incremented by one (starting at a zero index).
If you’re familiar with JavaScript’s Array.map, this is quite similar, but Notion Formulas do not have a callback function wrapper, just an expression.
Of course, dot-notation chaining works for lists as well so we could get the last item from the [2, 4, 6] array above like so:
					/* Returns 6 */
[1, 2, 3].map(current * 2).last()
Date parsing
One of the most powerful new functions in Notion Formulas 2.0 is parseDate. In Formulas 1.0, when you needed a specific date in your formula, you had to do something like this.
					/* 1691709578 seconds since Jan 01, 1970 */
fromTimestamp(1691709578000)
parseDate allows you to parse any ISO 8601 date, which is an international standard for dates, times, and timezones. The example above looks like this in Formulas 2.0:
parseDate("2023-08-10T23:19:36+00:00")
This allows us to do simpler dynamic date creation as well…
					/* We don't need a time and time-zone necessarily */
parseDate("2023-08-10")
Or move around in time…
					/* First of the current month */
parseDate(formatDate(now(), "YYYY-MM"))
					/* End of the current month */
now()
  .dateAdd(1, "months")
  .formatDate("YYYYMM")
  .parseDate()
  .dateSubtract(1, "days")
Comments and newlines
You may have noticed the notes in between /* and */ above. These are comments and they are now supported in Notion formulas as are newlines! Whitespace is also ignored in a lot of cases, so we can write formulas over multiple lines and align the chained function calls in a visually pleasing way. Comments are ignored when calculating your formulas and you can use them almost anywhere in the formula statement:
					/* End of the current month */
now()
  .dateAdd(1, "months")     /* Go to next month */
  .formatDate("YYYYMM")     /* Format to get just month and year */
  .parseDate()              /* Parsing will default the day to the 1st */
  .dateSubtract(1, "days")  /* Go back a day to last day of previous month */
Bonus: because the 2.0 editor supports writing formulas over multiple lines, the above code is 100% legit and could be pasted into the editor without breaking anything.
Variables
Instead of having to repeat the same operation over and over, you can now use the let (and it’s multi-variable partner lets) function to define reusable variables in your formulas.
let has the signature:
let(variableName, variableValue, expression)
variableNameis what we want to refer to the variable later asvariableValueis the value we want the variable to containexpressionis the formula code we can leverage the variable inside
let(var, 2 + 2, var * var)
Above we store the result of 2 + 2 ⇒ 4 in the variable called var. We can then use var as much as we like in the expression. In this case I did var * var ⇒ 16.
Below we show how parseDate combined with let makes date-based calculations obscenely more succinct with Formulas 2.0. These two formulas show a Next Birthday formula given a date property called Birthday:
Old wordy
My eyes! But seriously, back with no line breaks, this is really tough to read.
dateAdd(prop("Birthday"), year(now()) - year(prop("Birthday")) + if(toNumber(formatDate(now(), "M")) > toNumber(formatDate(prop("Birthday"), "M")), 1, 0) + if(toNumber(formatDate(now(), "M")) == toNumber(formatDate(prop("Birthday"), "M")), if(toNumber(formatDate(now(), "D")) > toNumber(formatDate(prop("Birthday"), "D")), 1, 0), 0), "years")
New hotness
Wow, so much nicer! And look at that gorgeous line breaking and indenting!
					let(birthday,
	parseDate(now().year() + "-" + prop("Birthday").formatDate("MM-DD")),
	let(today,
		parseDate(now().formatDate("YYYY-MM-DD")),
		birthday.dateAdd(today > birthday ? 1 : 0, "years")
	)
)
And here’s how that works…
- We use
prop("Birthday").formatDate("MM-DD")to get the month and the day of the birthday, example, May 31st would be “05-31”. - We add to the front of that the current year with
now().year(). In this example, this would result in “2023-05-31”. - We use
parseDateto turn that string version of a date into a date object and store the result in thebirthdayvariable usinglet. - We set another variable called
todayand usenow()to get the current date formatted withformatDate. UsingparseDateagain turns it back into a date object. This effectively convertsnow()to the beginning of the day. - Finally we add 1 year to the
birthdayvalue if it has passed.
We can also define multiple variables with lets which lets you pass in as many var/value pairs as you like before providing the final expression.
lets(var1Name, var1Value, var2Name, var2Value ..., expression)
So we can rewrite our let-based example above like so:
					lets(
	/* Set "birthday" (first argument) to the value in the second argument */
	birthday, parseDate(now().year() + "-" + prop("Birthday").formatDate("MM-DD")),

	/* Set "today" (third argument) to the value of the fourth argument */
	today, parseDate(now().formatDate("YYYY-MM-DD")),

	/* In the expression, we can use the "birthday" and "today" variables we've defined */
	birthday.dateAdd(today > birthday ? 1 : 0, "years")
)
ifs (if-switch)
The old if function remains and a new ifs function ships with 2.0. You can think of the s standing for “switch”. This allows you to drop the old nested if statements and supply pairs of conditions and returns. It works a lot like lets does for let.
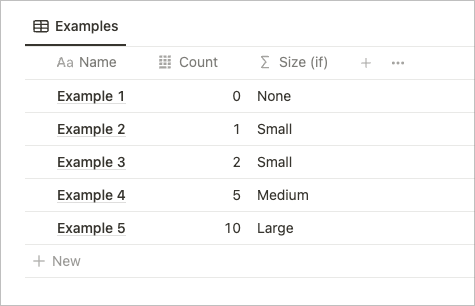
For example, let’s say you have a property called Count and wanted to display a Size (if) formula based on this count with the following ruleset:
- count greater or equal to 10, output “Large”
- count between 5–10, output “Medium”
- count greater than 0 but less than 5, output “Small”
- otherwise, output “None
Here’s how we’d do that with if…
if(Count >= 10, "Large", if(Count >= 5, "Medium", if(Count > 0, "Small", "None")))
Now that we can add new lines in our formula, we can make this a bit easier to read by adding new lines (by typing cmd/ctrl + enter) and indenting (by typing tab).
In Formulas 1.0 this would have broken our formula. Now this is totally valid!
					if(
	Count >= 10,
	"Large",
	if(
		Count >= 5,
		"Medium",
		if(
			Count > 0,
			"Small",
			"None"
		)
	)
)
Now, ifs allows us to make this even easier!
					ifs(
	/* LARGE */
	Count >= 10,
	"Large",

	/* MEDIUM */
	Count >= 5,
	"Medium",

	/* SMALL */
	Count > 0,
	"Small",

	/* DEFAULT */
	"None"
)
Well, gosh, that’s substantially easier to read! With ifs we can specify an argument pairing of condition/result, so we don’t have to nest each pair of conditions, we just add another condition and result value. The final argument can be provided as a “default”.
If return types no longer have to match
In 1.0, the following would raise a Type mismatch error because 1 and "A" are not the same type.
if(now() > prop("Birthday"), 1, "A")
In Formulas 2.0, you can write this safely. Be aware though that in this case the data will be coerced to a string, so you will not be able to use number formatting on the 1. There’s a sneaky workaround for this though which involves setting the format prior to turning the property into a formula.
Styling rich text
What if in my last example I wanted my sizes to have a different look? Enter style (and its counterpart unstyle).
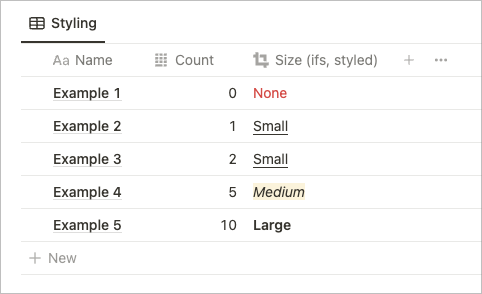
Wow! How cool is that?!
style takes a list of “style” strings and formats the string as rich text in the same way you might manually style text using Notion’s text editor. You can use any of Notion’s basic text styling and color combos.
					ifs(
	Count >= 10,
	"Large".style("b"),

	Count >= 5,
	"Medium".style("i", "yellow_background"),

	Count > 0,
	"Small".style("u"),

	"None".style("red")
)
You can also remove any styles applied to text with unstyle .
People references
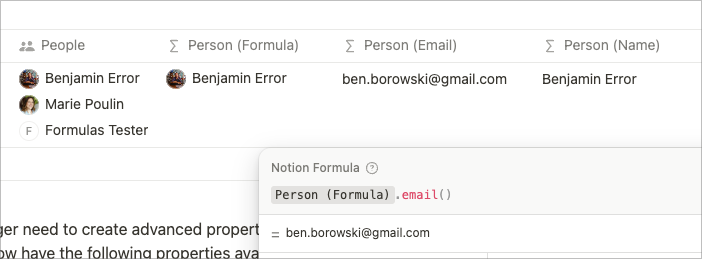
When using a Person property in Formula 1.0, the output would be turned into an email address. This meant that it wasn’t possible to filter on the currently viewing user when using formulas. Now we can manipulate these properties as lists and access the account’s email and name using the functions of the same name.
- Below we can see a
Personproperty calledPeople. Person (Formula)callsfirston that property, returning the first person in the list.- We can use
emailto get the email of a Notion user in our formulas inPerson (Email). - We can use
nameto get the name of a Notion user in our formulas inPerson (Name).
We also no longer need to create advanced properties such as Last edited by to access these properties in our formulas! In databases, Formulas 2.0 now have the following properties available to us on page references:
Created By– Returns a single Person objectCreated Time– Returns a Date objectLast Edited By– Returns a single Person objectLast Edited Time– Returns a Date object
It should be noted that the Created By and Last Edited By properties return single Person objects, whereas Person properties return a List/Array of Person objects (which is why I used first() on the Person property in the table view above). Also, note the case difference here. Last edited by is used for the Property type, whereas Last Edited By is used in formulas.
Relation references
You can now refer to properties of related pages directly in formulas. Which means you almost don’t need rollups any more unless you plan to filter on them.
For example, if I had a Weekly Agenda database that was related to a Journals database with a Miles Ran number property, I could get the sum of the miles ran on the weekly level with:
Journals.map(current.Miles Ran).sum()
You can do a ton with relations as lists now, including filtering. Definitely recommend checking out the video at the top of this blog for more ideas.
Operators
2.0 has added a number of programming-style operators. For example, if you wanted to created a conditional that tested two conditions, in 1.0, you might write one of:
or(true, false) /* => false */
and(true, false) /* => false */
In 2.0 we can also use many of the standard JavaScript-style operators:
true || false
true && false
UI Updates
Editor changes
The formula editor, while still requiring a single encapsulated formula now supports writing formulas over multiple lines and a live-preview. You can discover more about the editor by watching my video on the overview of Formulas 2.0.
Live database updates
The live-preview feature is new in the Formulas 2.0 editor. In 1.0, you would see the output in real-time in the database column itself. In Formulas 2.0, you can see a preview of the changes before saving, but we can no longer see the updates to multiple records in real-time.
While this does represent a loss in functionality, this makes Formulas 2.0 much faster to write than Formulas 1.0! You should notice considerably less “lag” as you type.
Other Language Updates
Formulas 2.0 is basically a superset of the vast majority of 1.0, but it is not backwards compatible.
Notion has done a fantastic job of automatically converting 1.0 syntax into 2.0 syntax, but your existing knowledge may not map to the new language. 2.0 removed many functions, changed others, and added a load of new concepts.
Formula Fundamentals 2.0
If any or all of this sounded like a foreign language to you, you can check out the new version of my Formula Fundamentals course. I’m re-writing it from the ground up for Formulas 2.0.
You can get on the wait-list and get a 20% off coupon by signing up at notionmastery.com/formulas.
Note: Notion Mastery students get free access to this course, support with custom formulas through our forums and office hours. You might want to join!
 Notion tips in your inbox